If you've purchased a stock Ardunio then you can skip this section. If however you have an '
off the production' ATMega328 device, don't want to to program via the IDE, doesn't have a bootloader, or are actually using the AVR version of this code, then you might run into problems.
The ISP header shares its pins with Pin 12. In my design you need to connect Pin 12 to GND. If you pull pin 12 to GND you will not be able to use the ISP header at all.:
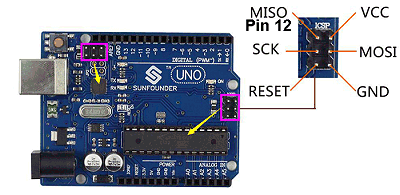
ISP headers on Arduino UNO
You could either flash the boot-loader, and then connect Pin 12 to GND, or:
- Make all of the hardware connections as described, but do not connect pin 12 to anything.
- Burn the boot-loader, then download and flash this sketch onto your device and wait for it to run.
- Monitoring via the serial port at 9600 baud, you should see Board successfully programmed. or Board already programmed. which means the code successfully wrote some special numbers to the EEPROM that the main code will detect and use instead of the Pin 12 signal.
- Now flash the normal code onto the device. All done. Just make sure you have pin 10 and pin 11 connected correctly. Pin 12 is now ignored by the code.
or
You can now set this from the Windows application! (Click DrawBridge Config and ensure "Force DiskChange Detection Support" option is ticked)
Why didn't I use a different pin?
Well, by the time I had realised this was an issue, physical hardware had already been produced by several people. Having never used the ISP headers myself it didn't occur to me it would be a problem.
<< Back to instructions